The ultimate beginner's guide to embroidery stitches (with free sampler!)

If you've ever wanted to learn embroidery but aren't sure where to start we've got you covered! This is the ultimate beginner's guide to 13 embroidery stitches. With video instructions and a free downloadable pattern, you'll be on your way in no time. With huge thanks to Mollie Johanson, who produced this post and designed the pattern.
Embroidery is a delightful and easy craft to learn and it all starts with a few basic stitches. One of the best ways to jump into embroidery is with a stitch sampler. With a sampler you can try a bunch of stitches while making something to display on your wall (or make into another project).
With this sampler, you can learn and practice 13 different stitches which work up on 12 shapes. You can choose to arrange the stitches however you like and with as many or as few colors as you want. Additionally, we have four different sampler patterns for you to work with so there's no shortage of options for customizing your embroidery!

Supplies
- Fabric (we used Essex Linen in Grey)
- Embroidery thread (we used DMC Ecru, 415, 892, 606, 740, 3828, 958, 3766, 334, and 517
- Wipe-off pen
- 10-inch embroidery hoop
- Embroidery needle (we used a size 3)
- Sampler pattern - link here
We have a kit with all the supplies here.
You will also need embroidery scissors.

Getting Started
Trace your sampler pattern on the fabric with a water-soluble pen. The easiest way to do this is to tape the printed pattern to a brightly lit window and then tape the fabric over it. Place the fabric in your embroidery hoop. Keep the fabric held taut, but make sure it's not stretched in a way that distorts the design.
Cut a piece of embroidery thread that's about the length from your elbow to fingertips. For this sampler, we used all six strands of thread. Hold the very end between your fingertips, squeezing it as you push it through the eye of your needle. Tie a knot at the other end of the thread. Yes, it really is okay to start and end with a knot!
Now it's time to try your first stitch! Work your way through the stitches in order, as they build on each other. You can also watch the sampler come together on video so you can see these stitches in action.

Straight/Seed Stitch
Straight stitch is the most basic stitch you can learn, and many stitches use this in one way or another. You can use this to make a single straight line (this is called running stitch - see below) or create a scattering of straight stitches to make what is called "seed stitch." Be careful not to make your stitches too long or they can easily get snagged and then pulled out of shape.

Come up through the fabric at point 1 and go back down at point 2. Repeat for each stitch.

Running Stitch
Like a dashed line of thread, running stitch is as simple as going up and down through fabric. It's actually a lot like working straight stitches, but following a line! Running stitch is great for borders and accents, as well as forming more subtle outlines. Sashiko embroidery is a form of running stitch that has specific proportions.
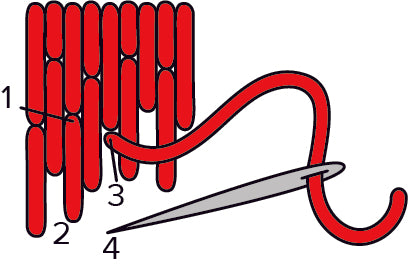
Come up through the fabric at point 1 and go back down at point 2. Come up at point 3 and go down at point 4. Repeat as you follow the pattern line.

Back Stitch
As the name suggests, when you work the back stitch, each stitch goes back in the opposite direction as the lines you're making. It's great for making outlines and you can use it on just about any embroidery pattern!

Come up at point 1 and go back down at point 2. Come up at point 3 and go back down at point 4, which should be the same hole as point 1. Repeat.

Split Stitch
This stitch does just what it says: it splits stitches. The result is a solid outline on the front, while the back usually looks a lot like back stitch. To keep the line solid, try to actually pierce through the thread, rather than bringing the needle between the strands of thread.

Come up at point 1 and go down at point 2. Come up at point 3, halfway between points 1 and 2, splitting the previous stitch. Go down at point 4. Repeat.

Stem Stitch
Another good stitch for making outlines (or plant and flower stems!) is stem stitch. This stitch looks a bit like a tiny twisted rope and is good at handling curves. The trick is to always keep the working thread below the stitching line.

Come up at point 1, just a tiny bit above the stitching line. Go back down at point 2, just a tiny bit below the stitching line, keeping the working thread loose on the surface. Come up at point 3, just above the stitching line and halfway between points 1 and 2. Pull the stitch taut and go back down at point 4, just below the stitching line and keeping the working thread loose. Repeat.

Chain Stitch
There are lots of variations of chain stitch, including more than one way to work the basic version. And it really does look like a chain! This is the easiest method and it's sometimes called reverse chain stitch.

Make a small straight stitch. Come up at point 1 and slide the needle under the first stitch. Go back down at point 1. Come up at point 2, slide the needle under the previous stitch, and go back down at point 2. Repeat.

Lazy Daisy/Detached Chain
Similar to chain stitch, this is just one "link" in the chain. It's often called lazy daisy stitch, which refers to making a group of these as a flower. Working just one is known as a detached chain. To keep the flower petal shape, be careful not to pull the loop too tight.

Come up at point 1 and go back down at the same point, leaving a loop of thread on the surface. Come up at point 2, catching the loop of thread. Go down at point 3, tacking the stitch in place.

Fly Stitch
The way you form fly stitch is a lot like a detached chain stitch, but it's versatile and can take different forms. You can pull the first stitch tight with a small tacking stitch to make Vs, or with a long tacking stitch to make Ys. If you keep the first stitch looser you can make little scallops.

Come up at point 1 and go back down at point 2, leaving a loop of thread on the surface. Come up at point 3, catching the loop of thread. Go down at point 4, tacking the stitch in place.

French Knot
These little knotted stitches often get a bad rap for being too hard, but with a bit of practice, you can make French knots! They are ideal for stitching small dots, but you can also use them to fill in an entire area.

Come up at point 1. Wrap the working thread around the needle two times. Partially insert the needle at point 2, which should be right next to point 1, but not the same hole. Hold the wrapped working thread taut (but not too tight!) around the needle as you draw it through the fabric.
Tip: Holding the working thread with your non-dominant hand helps keep the French knot tight and uniform in shape.

Satin Stitch
When you want to fill in an area with smooth, even texture, satin stitch is a beautiful choice. One thing to remember though is that if your stitches get too long, they can easily snag or even get a little loose.

Come up at point 1 and go back down at point 2. Come up at point 3 and back down at point 4. Repeat, always coming up on one side of the area and down on the other.
Tip: Often it helps keep the stitches straight if you start in the middle of the area you're filling and then work your way out on either side.

Long-Short Stitch
Similar to satin stitch, long-short stitch is useful for filling in solid areas. This version uses staggered stitches so you don't end up with stitches that get too long. You can work the stitches so they are uniform like bricks or with varying lengths more like sketched lines.

Start with a row of alternated long and short stitches. Fill in the gaps by coming up at 1 and back down at 2. Come up at 3 and down at 4. Repeat, working across the row.
Blanket Stitch
Blanket stitch is commonly used as edging or to hold felt applique pieces in place, but it also works as a decorative embroidery stitch.

Come up at point 1. Go down at point 2, leaving a loop of thread on the surface. Come up at point 3, catching the loop of thread. Go down at point 4, leaving a loop of thread on the surface. Repeat. To end, tack down the last loop with a small stitch.
If you are using this stitch as edging on a hem, point 1 should be close to the fabric edge or through a folded hem. Instead of coming up through the fabric for point 3, come up around the edge of the material.

Feather Stitch
To add decorative scallops that look like feathery plants or scales, give feather stitch a try! There are several variations for this stitch, but one simple way to play with this stitch is to overlap it in different colors for more coverage and beautiful depth.

Come up at point 1 and go down at 2, leaving a loop of thread on the surface. Come up at point 3, catching the loop of thread. Go down at point 4, leaving a loop of thread on the surface. Repeat, working back and forth.

Finishing

After you finish all the embroidery, soak your fabric to remove the pattern markings. It's important to let it fully soak instead of just rinsing so the ink fully dissolves. Gently press the embroidery between two towels to remove excess water, and then hang it to dry. Place the embroidery face down on a fluffy towel and gently iron it from the back.
Frame your embroidery in an embroidery hoop or use it to make another project. You can make a wall hanging or even sew it into a pillow!
Comments
Rebecca said:
I’ve just seen this on your Instagram account. It looks lovely and I would definitely like to give it a go at some point. Thank you.