Make picnic-inspired napkin rings!

Fancy up your picnics and dinner parties with these needlepoint napkin rings! This gorgeous project is by Emma Homent, founder of The Maker's Marks kits. This tutorial is perfect for beginners as Emma walks you through all the steps right from the beginning. With some squidgy DMC tapestry wools and plastic canvas, you'll be able to whip up a set of these in no time at all. Use them all year round to bring back memories of Summertime picnics in the park.
Over to you Emma......
In this project I’ll show you how using needlepoint's Wicker Stitch you can create a quick and cute accessory.
Tools and Materials

- A sheet of 10ct plastic canvas
- 20x30cm sheet of 100% wool felt in Forget-me-not
- fabric glue like Hi-Tack
- Embroidery scissors
- A tapestry needle
- 1 skein of DMC tapestry wool 7796 - Dark Blue
- 1 skein of DMC tapestry wool 7802 - Mid Blue
- 1 skein of DMC tapestry wool Blanc
- Download the chart
Step 1.
We’ll use the ‘Waste Knot’ method to cast on your stitches.
Take a length of your Mid Blue tapestry wool (from your finger tips to the crook of your arm is perfect) and tie a knot in the end.
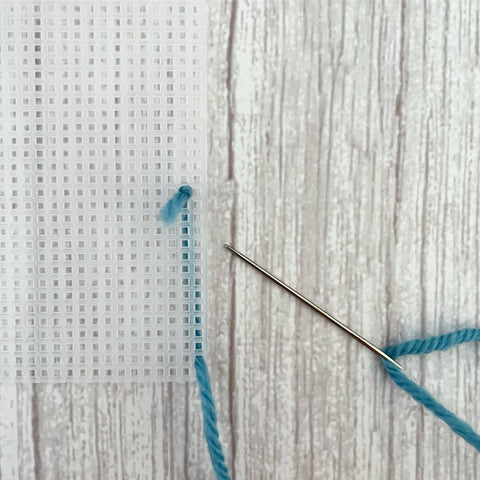
Thread your needle with the unknotted end and bring your wool through the canvas and up one canvas hole above the bottom righthand corner (as shown in the picture).
This will leave the knot on the top side of the canvas.
Step 2.

Stitch your first block of Wicker Stitch as shown above, trapping your tapestry wool length on the back of your canvas, as shown below. Each Wicker stitch length travels across 4 bars of canvas as you can see in the chart.

Continue to stitch the next two Mid Blue blocks until you feel enough of the thread is secured underneath and then snip away your waste knot.
Step 3.
It’s time to introduce your next colour! With some of the White tapestry wool on your needle run it through the back of some of your stitches to cast it on.


Complete two blocks of Wicker stitch in white and then move on to the Dark Blue.

You can ‘Park’ you threads between use of colours to save you threads getting in a knot or having to repeatedly cast on and off.
Carry on in this way following the chart to see which colour block goes where.
When you start to run out of your thread (about 2-3 inches left) it will be time to ‘Cast off’ your stitches. Simply run the remaining thread through the back of enough stitches to it feels secure, and snip off the excess.
Step 4.
Now that you’ve finished all your blocks it’s time to trim your canvas.

Leave one bar (line) of canvas around your Dark Blue stitches top and bottom, and one bar on the right and five bars of canvas on the left, as shown below.


Step 5.
Now place your stitched canvas on top of your felt and cut around it.

Don’t worry if it’s a bit wonky, you can trim it down a bit more later.
Step 6.
It’s time to Whip Stitch your top and bottom edges.

To Whip Stitch just bring your needle up through the canvas and loop the tapestry wool over the edge of your canvas and back up through the next hole.
You’ll find that some of the Whip Stitches will just go across one bar of canvas but the next three will have to go over two bars of canvas and tuck under your stitched canvas surface to keep a neat finish as shown below.


Step 7.
Time to trim your felt a little bit more.

The perfect size is one stitch shorter than three of your edges and approx 2.5cm shorter than the other. Once you’ve cut it to this size put the felt to one side.
Step 8.
The very last bit of stitching now!

Continuing to Whip Stitch join your two remain ends making sure the five empty canvas rows on the one end are tucked inside the ring shape. This creates a lip that gives your napkin ring structure and keeps it in a perfect circle.
Once all your stitches are in place cast your thread off by running it carefully in the back of your stitches.
And finally gently dab dots of fabric glue on one side of your felt and carefully place and smooth it inside the ring.
Et voila! You have a perfect handmade napkin ring.
The chart shows you a checker effect in three colours, but it’s just as effective in one colour. If you choose to stitch this project in a single colour then you will need two skeins. I couldn’t resist stitching it in DMC 7506 too to create a basket effect!
*
Thanks so much for this tutorial, Emma! Emma has been pioneering the rediscovery of all the incredible needlepoint stitches in her popular #stitchmondays posts on Instagram. She will soon be sharing more, with her new needlepoint book being released on 13th September. In this book, Emma shares her passion for this traditional craft in a fresh and contemporary way, with a desirable modern aesthetic for a new generation of needlepointers. You can pre-order it here.