Make beautiful folk-style craft ornaments!

Add some handcrafted Scandinavian flare to your tree with these adorable embroidered felt ornaments! Celebrating our favourite craft, they feature little embroidery thread bobbins and a sparkly embroidery hoop fit for Christmas.
What stitcher doesn't want these ornaments for their festive decor?!?
With thanks to Mollie Johanson for this tutorial.


It can be tricking cutting small felt pieces or stiff materials like our glitter felt, so for this project we recommend using freezer paper. For this technique you trace templates on the paper, the iron the paper onto your felt. Instead of fiddling with a pinned on paper that moves or felt pen lines that are not always easy to remove, the freezer paper holds in place until you peel it away. So simple!
With a few basic stitches, you can whip up a whole batch of these sweet little decorations for yourself or a friend.
Tools and Supplies

- Freezer Paper
- Pencil
- Wool Felt (we used Strawberry Field, Artichoke, and Brand Spanking White)
- Gold Glitter Felt
- Iron
- Scissors
- Tissue Paper (optional: Sulky Sticky Fabri-Solvy or wipe-off pen)
- DMC embroidery thread (we used 321, 892, 3820, 470, and ecru)
- Embroidery Scissors
- Embroidery needle
- Extra-Long Brad Paper Fastener
- Hi-Tack glue
- Scandi Folk Craft Ornaments Pattern PDF - download here
Step 1

Print the pattern page, then trace the pieces on the non-shiny side of the freezer paper, grouping them by the felt colors you're using. You will need one rectangle and two bobbin pieces for each embroidery thread bobbin ornament. You will need two hoop pieces, two circles, and one tree shape for each embroidery hoop ornament.
Step 2

Iron the freezer paper onto the felt. If you're using glitter felt, iron the freezer paper to the back of the felt, not the glitter side.
Step 3

Cut out all of the felt pieces on the traced template lines. Peel away the freezer paper.
Step 4 - Make the bobbins

To make the embroidery thread bobbins, trace the embroidery designs onto tissue paper. You only need to embroider one bobbin piece for each ornament.
Use three strands of embroidery thread and satin stitch for the little hearts, lazy daisy for the leaves, and French knots for the dots (you can find instructions for these stitches here). Tear away the tissue paper.
Note: You can also transfer the design by drawing it directly onto the felt using a wipe-off pen, or you could use Sulky Sticky Fabri-Solvy (if you use Solvy, don't forget to pre-shrink the felt before you cut out the pieces!).

Hold the stitched bobbin and the plain bobbin together and whip stitch around the edges with matching thread.

Wrap the rectangle around the bobbin and stitch the ends together with matching thread.

Cut a piece of matching embroidery thread that's a little longer than your full arm. Tie a knot in one end and thread a needle on the other end.
Bring the thread up through the back of the wrapped bobbin.

Gently wrap the embroidery thread around the bobbin, just as you would on a regular bobbin.
On the back, stitch through the wrapped felt and secure the end with a knot hidden under the felt.

Thread a needle with three strands of embroidery thread about 20cm long. Slide the needle through the back of the bobbin, going through just one layer of felt.
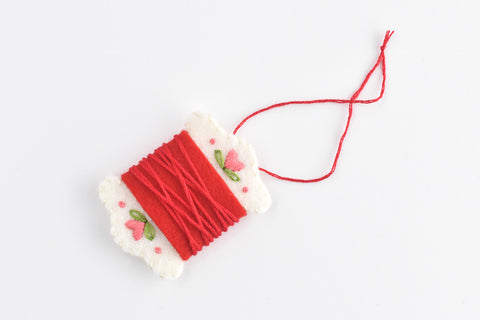
Tie the ends of the thread together at the length you want the ornament to be, then trim the ends.
Step 5 - Make the embroidery hoop

Stitch the tree onto one circle of felt, using three strands of embroidery thread and running stitch around the edge.

Trace the tree embroidery designs onto tissue paper and place the tissue on top of the tree and circle. The heart should sit on the top of the tree.
Embroider the designs using three strands of embroidery thread. Use satin stitch for the heart, lazy daisy for the leaves, back stitch for the stem, and straight stitches for the stars.
If you want to customize the back of your ornament, you can add a date or a message to the second felt circle.
Tear away the tissue paper.

Place the stitched circle centered behind one of the glitter felt hoops. Stitch around the inside of the hoop and through the felt circle using tiny whip stitches. Repeat with the second circle and hoop.

Hold the two hoop pieces together with the wrong sides facing each other. Stitch around the outer edge of the hoop with whip stitch. Stop when you get to the top tightening bracket area.

Use craft glue to hold the paper fastener between the felt layers that make the bracket. This makes the tightening screw that embroidery hoops have.
Finish whip stitching around the top of the bracket area.

Add an embroidery thread hanger in the same way you did for the thread bobbins.

Now you have a set of embroidery-themed ornaments to hang on your tree or give to a friend! They also make adorable gift toppers, which you really could use any time of the year.

You can easily customize the ornaments by using your favorite colors of felt and embroidery thread on the bobbins, or changing out what you stitch inside the embroidery hoop.
Happy stitching!