Beginner's Guide to Sashiko Embroidery

Have you always wanted to learn Sashiko embroidery?
Sashiko is a form of Japanese embroidery that creates beautiful patterns and designs with a type of running stitch. Because there is just one basic stitch to learn, it's easy to jump into. Of course, like any style of embroidery, it takes plenty of practice to master, but you'll have lots of fun learning along the way. Walk through this introduction to learn the basics of sashiko and get started!
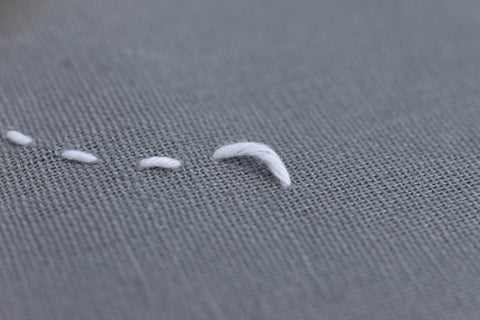
The word sashiko literally means "little stabs" in Japanese, and that's exactly what you do as the needle runs up and down through the fabric making dashed lines of stitches. One of the things that makes sashiko unique is that it uses long needles that allow you to make many "little stabs" as you stitch a number of those dashed stitches at once.

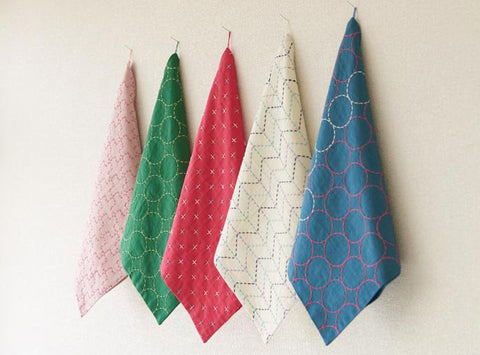
When most people think of sashiko, they picture the traditional version, which uses indigo dyed fabric and white sashiko thread to make repeating patterns or the occasional intricate design. Modern sashiko takes its cue from that, while bringing in lots more color and new patterns to follow or even create on your own.
Ready to give it a try? Here's what you need to know about starting your first sashiko project!
Materials
Sashiko embroidery uses materials that likely feel familiar to anyone who has done embroidery, but there are a few specialty tools and supplies.
While you can use stranded cotton embroidery thread or even perle cotton, sashiko thread is designed for this type of stitching and that makes it easier to work with. You can find lots of colors to choose from and even different thicknesses. Here at Cloud Craft we stock Cosmo Hindamari sashiko thread, which is made in Japan and comes on easy to use spools.

Sashiko also uses long needles designed for this type of embroidery and thread. They come in different lengths with the longest for straight lines and slightly shorter needles for stitching curves. Some stitchers also like to use a sashiko thimble to help push the needle through the fabric.

When you want to mark sashiko patterns on your own, you can use a stencil, trace a design, or mark out a grid with a ruler. Quilting rulers are especially helpful for this. You will also need an embroidery pen or pencil that allows you to easily remove the markings.
Just like any embroidery, you really can do sashiko embroidery on any type of fabric you like, but the structure of the material will make a difference both for the process and the results. Cotton or linen (we love Essex Linen) are excellent for sashiko because it's easy to stitch through, however you do need to be careful not to pull your stitches too tight. Stiffer fabric like canvas is harder to work with as you stitch, but the stitches don't pull or pucker.
If you're unsure what fabric or pattern marking method to start with, consider a kit that includes pre-printed fabric. It saves lots of time and questions!
Now, let's look at how to take your first stab at sashiko.
Sashiko Basics
Here are some top tips to get you started with Sashiko.
Tip 1 - Setting up your pattern

Sashiko stencils are easy to use and great for repeating patterns. Some, like the templates we have in the shop, even have the stitches themselves spaced out. To use sashiko stencils, hold the stencil in place while you mark the lines with a removable pen or pencil.

When making a repeating pattern, move the stencil so that the first set markings align with the stencil, then mark another section. Repeat this to move the stencil around as many times as needed.
Tip 2 - Hooping up
You can do sashiko with or without an embroidery hoop! If you choose to work in a hoop, it helps to keep the fabric a little looser so you can make several stitches at one time.
Tip 3 - Starting off
While you can start sashiko embroidery with a knot, it's recommended that you avoid it. Instead, when you come up through the fabric with a new thread, leave a long tail on the back. It should be about 12 cm long. You'll come back to this later.

Tip 4 - Stitching!
Sashiko stitch is like running stitch where you are just going up and down through the fabric. You can use the long sashiko needle to make many stitches all at one time on the needle. On straight lines you can form more stitches, but on curved lines you will need to only do a few at a time.

When you pull the needle through, be sure to smooth out the stitches and fabric so the tension is even and there's no fabric puckers.
Traditional sashiko stitches are equal in length with a gap between them that is about 1/3 the length of the stitch. Getting the proportions right and stitching with consistency takes a lot of practice. Don't worry if you don't immediately see picture perfect results!

It's also okay to find a stitch length and gap that works for you. In fact, some patterns require different spacing. What's most important is keeping the stitches consistent.
One "rule" in sashiko is that the stitches should never cross each other or the gaps. The stitches shown below on the left are not correct. Instead, where lines of stitches would cross, they should always meet at the gaps between the stitches.

When a pattern requires that you "jump" a bit between the stitches or when you turn a tight corner, you should keep the back of the jump a little loose. This helps keep the stitch tension even, especially on items that may be laundered.
Most sashiko patterns include a guide that suggests the best route to follow. Do your best to follow that guide, but you can also look for the route that makes sense to you. The goal is to stitch a direct path with the least number of starts and stops as possible.

Tip 5 - Ending your thread
To end a length of sashiko thread, weave the thread through the back of several stitches. Do the same with the starting tail.

When all of the stitching is done, remove the pattern markings.

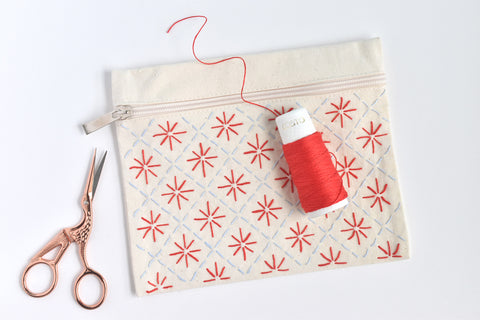
You can also make your own pattern markings with a ruler. For this, let's make a modern design on a fabric pouch.
For this project we used our cream zipped pouch, Hindamari sashiko threads in red and blue and sashiko needles.
Step 1

Start by marking a grid at a 45-degree angle with the lines spaced 3 cm apart.
Step 2

Stitch the grid with sashiko stitch.
Step 3

Mark 45-degree angle lines between the stitched lines going in both directions. Next, mark horizontal and vertical lines that match the points of the stitched lines. You don't need to mark right up to the stitches, but make the lines long enough that you can easily see them.
Step 4

Stitch along the marked lines to form star flowers in the middle of the grid. Rather than stitching one star flower at a time, you are making lines that then become those motifs
In this case, the stitch length should be as consistent as possible, but the gap length will vary. Also, be sure to keep the centers of the star flowers open.
Follow a path that goes from line to line, starting and stopping at the edges of the design.
Step 5
When all the stitching is done, remove the pattern markings.

Sashiko is a beautiful and versatile form of embroidery that is wonderful on clothing, home decor, accessories, and more. It's one of those things that is both simple and complex and that's what makes it so special.
Happy stitching!

With thanks to Mollie Johanson for this fab tutorial!
Comments
Eka Sol said:
Such a wonderful insight in a beautiful technique that cannot wait to try.
Thank you.