Our Basic Guide to Cross Stitch
Cross stitch is such a relaxing craft - it's very soothing and there's something magical watching the little crosses come together to create a design. If you're a beginner this basic guide has everything you need to know for your first cross stitch project.
Sometimes known as counted cross stitch, this needlecraft is exactly what it sounds like: counting stitches that are shaped like little Xs or crosses! Even though the overall idea is simple, it helps to have a few tips and tricks up your sleeve when it's time to choose your materials and take your first stitches.

Cross stitch is suitable for stitches of all ages, as long as you choose a pattern or kit that matches your skill level and dexterity (and sometimes eyesight!).
The most important thing to remember when starting out or upping your skill level is to pay attention to the pattern. Read the recommended materials, check how many strands of thread to use, and when in doubt, double-check your counting.
With that crossed off the list, let's take a look at what you need to start stitching.
Materials

Cross Stitch uses just a few simple supplies, which makes it an easy and inexpensive craft to dip your toes into or go for a deep dive.
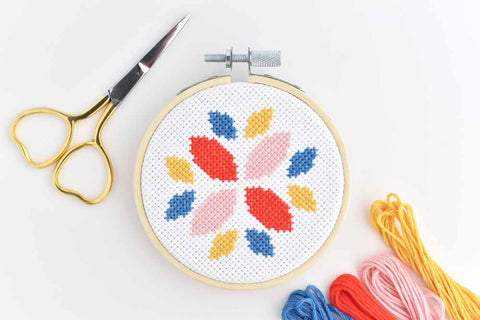
Pattern - Cross stitch patterns can range from small and simple with just one or two colours in a basic stitch all the way up to very complex with different stitches and a full spectrum of threads. Start with a beginner-friendly design like the free pattern included here. On you chart each box represents 1 cross stitch. The boxes have a colour (and sometimes also a symbol), which represents a specific thread colour.
Embroidery Thread - Most cross stitch uses stranded cotton embroidery thread or floss. We like DMC thread because it's less likely to tangle and has a beautiful smooth finish. This is usually made up of 6 strands, which can be separated into individual strands. Each pattern typically gives a recommended number of strands to use.
Cross Stitch Needle - When cross stitching, it's best to use a needle with a rounded tip (so you don't pierce through your fabric but go through the holes) and a larger eye. Some needles or fabrics give suggested size pairings, but you may find that you prefer a different size. For starting on 14-count Aida, start by trying a size 26 cross stitch needle.
Aida - This fabric is designed to make it easier to count your stitches. It comes in different thread counts, so be sure to pay attention to what side is suggested for a pattern. Aida with lower numbers results in larger stitches and higher numbers produce smaller stitches and overall design size. 14-count is one of the most common sizes.
Other Fabrics - Evenweave linen is another popular choice for cross stitch, and you can also stitch on lots of other fabrics using waste canvas or soluble canvas to create a grid to follow. These options are a little more difficult to work on, so it's best to start with Aida.
Embroidery Hoop - Basic embroidery hoops work great for cross stitch. Many people are also surprised to hear that a hoop is actually optional! If your fabric is stiff enough, you can just hold it while you work.
Scissors - Choose a pair that will cleanly snip your embroidery thread. Smaller points make it easier to cut the thread close to the back of your work.
Water-soluble Pen - This is another optional tool, but it can be helpful for marking your fabric.
Step 1 - Prepare Your Fabric

Cut a piece of fabric that is large enough to accommodate your cross stitch, plus extra margin for placing it in a hoop or whatever amount you need for finishing (anywhere from 3 to 10cm). Stitched onto 14 count aida the design here is approx. 7x7cm, so a square 15x15cm would be perfect.
Next, find the center of the fabric so you can start your stitching in the right spot. To do this, fold the fabric in half and crease it, then fold it again in the opposite direction. Mark the center point with a water-soluble pen or even a pin just to get started.

It can be handy to mark out the edges of your pattern. To do this, using the marked center for reference, count the number of squares out to the edge of the pattern grid. Use a single strand of embroidery thread to make basting stitches every 5 or 10 squares around the edge. This helps you stay on track while you stitch (it will be removed later) because it makes it easier to count and see where you should be on the pattern. For the pattern in the sample, the overall size is 35 x 35 squares.
Step 2 - Cut! Split! Thread!
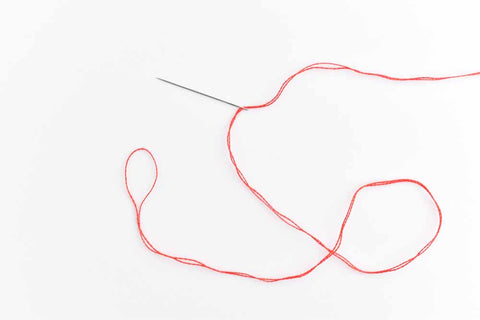
Cut a piece of embroidery thread that's about as long as your forearm and hand. Thread your needle with the number of strands you need.
OR, if you're going to work with an even number of strands, try the loop method. Cut a piece of thread that's twice as long as your forearm and hand. Use half as many strands as you need. Fold the strand(s) in half and thread the cut ends through the needle. There will be a loop at the other end.
Starting Method 1: The Loop Method
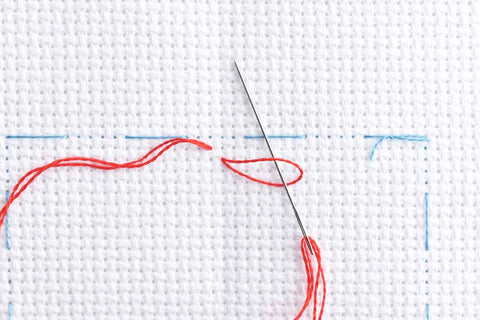
To start your stitching with the loop method, come up through the fabric for your first stitch, but leave the loop on the back. Go back down through the fabric as you finish the first stitch, then slide your needle through the loop. Pull the thread to tighten the loop and secure the thread on the back of the fabric.
Starting Method 2: The Away Knot

Another way to start your stitching is with an away knot. This is helpful for when you need to use an odd number of strands or if you are using threads that can't be folded to make a loop.
Tie a knot at one end of your thread. Go down through the fabric away from the stitching area, but still in the same zone. Come up through the fabric to start your stitching.

Try to have the long thread on the back be in an area you will stitch over. As you work, your cross stitches will go over the thread to help secure it.
When you finish that section or length of thread, you can snip the away knot and either trim it off on the back or thread your needle and weave the extra thread through the back of your stitches.
Where to Start?
Lots of cross stitch instructions tell you to always start at the middle of the entire pattern. You can do that, but it's okay to start in another area as long as you know that you're in the right spot. For example, in this sample design, it works well to start at the middle of one edge.
Your First Stitch
To make your first cross stitch, come up at the bottom left corner of one square and go back down at the top right of the square. This is the first half of a cross stitch.
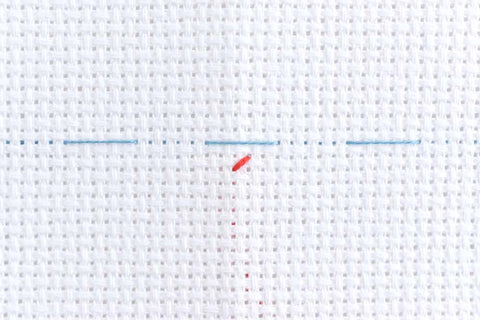
To finish the stitch, come up at the bottom right of the square and go back down at the top left.

This makes one whole cross stitch. Sometimes you might need to start a stitch through a different corner of the square, and that's okay! But be sure to make all the stitches crisscross in the same direction.
You can make one stitch at a time, but it's faster to stitch a row or section with all the first half of the cross stitches, then go back and finish each stitch going in the opposite direction.

Faster Stitching!
Another way to work that can really speed up your cross stitching is called the sewing method. For this, it helps to hold the fabric without a hoop and turned at an angle.

After coming up through the fabric, dip the needle down through the fabric to finish the half stitch, then bring the needle back up through the hole to start the next stitch.
This method keeps your hands on the front of the fabric and you don't have to poke around for the right place for your needle to come up. Just be careful not to snag your previously worked stitches. You can also jump between standard stitching and the sewing method when you need to!
The End (of a Thread)

When you reach the end of a section or a length of thread, don't tie a knot. Instead, slide your needle through the back of completed stitches.
TIP: It's best not to make big jumps between sections because that can create a messy and lumpy back on your stitching. Instead, end your thread and start a new one—or if you just need to make a small jump, slide the needle under a few stitches on the back of your work, like above.
More Stitches!

Basic cross stitch usually only uses a few stitches. And beginner-friendly patterns typically stick to whole stitch and some back stitch. More advanced patterns sometimes include fractional stitches to help shape the design.
The samples above show how the stitches look on a single square of Aida as well as working over 2 x 2 squares so you can see how they work a little easier.
Whole stitch - This is the most common cross stitch. It's just an X!
1/2 Stitch - This diagonal line can go in either direction and is just one half of a whole stitch.
1/4 Stitch - These are also diagonal lines that can go in any direction. They start in one corner of the square and go directly through the center of the square.
3/4 Stitch - This stitch combines a 1/2 stitch with a 1/4 stitch, just like regular fractions!
Back Stitch - When it comes to details, outlines, or text, back stitch is a common choice, and it works just like back stitch in embroidery. Patterns generally show this as a thicker line over the rest of the chart.
Additionally, some patterns include French knots or a few other detail stitches, but they are less common.
Getting the Best Results

One important thing to remember as you add more and more stitches to your project is to always keep the stitches going in the same direction. In this pattern, that means some of the petal shapes work from point to point, while others work from curved edge to curved else. But it's always top to bottom.

It's not the end of the world if some of the stitches go the opposite direction, but your work will look so much nicer if they are all the same.
Another thing to remember is that you want to count all of the stitches accurately. Sometimes being off by one stitch doesn't show much, but it can make a big difference. Don't be afraid to pull out some stitches to get it right. But it's also okay to work around mistakes and just have fun!
Correcting mistakes
If you notice that you've made a mistake it's usually best to correct it because one stitch out of place can have a big impact with cross stitch, as it can send the whole design out of shape. It's easy to correct - simply remove your needle and using the blunt end you can unthread the stitches. If there are quite a few stitches to remove it can be easier to cut them out with some small, sharp scissors. It can help to pick out the bits of thread with tweezers.

This design, which is based on our logo, looks especially good when you frame it turned it 45 degrees. You can also very easily switch out the colours in this pattern to your favorite embroidery thread shades!

Once you get started doing cross stitch, it's hard to stop…even though it's not the fastest craft around!
Happy stitching!
With thanks to Mollie Johanson for this tutorial! For more cross stitch designs from Mollie, check out her upcoming book Cross stitch Celebrations: Bundle of Joy!