Embroider Felt Floral Egg Decorations
Celebrate spring with these hand-stitched floral eggs made from the softest wool felt. Here's a free pattern and tutorial to stitch these pretty Easter Eggs. Each one can be as unique as you like, blending embroidery and felt applique elements to make hanging decorations.
Cutting out the felt pieces, arranging them, and then stitching the flowers in place is a wonderful way to relax and enjoy the season. It's also a project that kids can help with. Cutting the small flower pieces might be tricky for them, but they can certainly do a lot of the stitching.

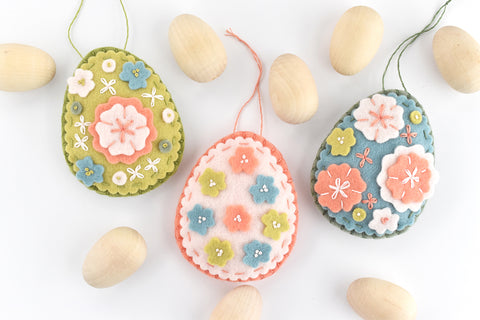
These sweet little eggs are perfect for hanging on a branch brought in from the garden. Pair them with wooden eggs or perhaps some wool felt balls?
You can also use this same pattern to make a bunch of eggs and string them together to make a garland for your mantle. Or how about making just one and then sew a brooch back on the reverse to wear it as a brooch? Which ever version you create, making the with our heirloom quality 100% wool felt will mean that they will be enjoyed year after year.


Tools and Supplies

- Freezer Paper and Pencil
- 100% wool felt (we used Scottish Salmon, Nougat, Morning Mist, Eucalyptus, Popeye's Gal, and Chartreuse from the Desert Rose collection)
- An iron
- Scissors for cutting felt and 5mm Scallop Shears
- DMC embroidery thread (we used this set plus DMC 522)
- Needle (size 5 works well)
- Polyester Toy Filling
- Download of Floral Egg Decorations Pattern
Step 1

Trace the pattern pieces onto the non-shiny side of the freezer paper. For each egg you will need two large egg pieces and one small egg piece, plus all the flowers you want.
As you trace the pieces, it's helpful to group them by color. For example, trace all the pink pieces close together, then on another piece of freezer paper, trace all the light green pieces, and so on.
For the small egg pieces, cut out the freezer paper templates. For all the other pieces, cut around them loosely.
Step 2

Place the pattern pieces shiny side down on the felt, and iron the paper to hold it in place on the felt.
TIP: When placing the small egg shape, be sure to leave a little space around it, as you will need this when cutting with the scallop shears.

Iron all of the pieces down onto the different colors of felt.
Step 3

Use the scallop shears to cut out the small egg pieces. Cut around the template so the scallops extend past the paper.

Use regular scissors to cut out all the rest of the pieces. Since you're cutting through felt and paper, you may not want to use your best sewing scissors, as the paper will dull them faster.
Peel off the paper backing.
Step 4

For each egg, layer two larger eggs with a smaller egg. Next, arrange some flower pieces however you'd like. There are so many ways to create your flower designs, so don't feel that you need to only replicate the examples. You can use more or fewer flowers than you see here.
TIP: When you find an arrangement you like, take a phone pic to help you remember the layout!
Step 5

Set the flowers and back egg shape aside. Using three strands of embroidery thread and running stitch, sew the scalloped egg to one of the plain egg shapes.
Step 6

Now you can start adding flowers. For the large flowers, you can layer them or use them on their own. We used straight stitch wrapped around the edges, then lazy daisies in the centers.

For the small flowers and circles, we used French knots.
As you add the felt flowers, you may decide to change up the layout or even add more pieces. That's part of the fun of this type of project!

As a final touch, add some lazy daisy embroidery between the felt flowers.
Step 7

Now it's time to sew the front and back of the egg together with blanket stitch. Thread a needle with three strands of matching embroidery thread and knot the end.
Hold the felt pieces together and come up through only the front layer (so your knot is sandwiched between the 2 layers). Go around to the back and come up through both layers in the same spot you started.

Slide the needle under the loop of thread from the starting stitch, going from right to left.
TIP: If you're left-handed, you can flip these instructions for easier stitching.

Come up through the layers of felt just to the right (we used the scallops as a stitch guide!). Before pulling the stitch tight, slide the needle under the loop of thread formed between the stitches.
Repeat this step around the egg shape. Stop when there's about 3cm left unstitched.
Step 8

Add a bit of toy filler into the egg.

Finish stitching the egg closed. When you get to the end, slide your needle under the very first stitch you made. Go through the back of the egg in the same spot where you started the stitching. End with a knot between the felt layers.
Step 9

Thread your needle with a piece of embroidery thread and take a stitch through the back of the egg near the top.
Step 10

Tie the ends of the embroidery thread together to make a hanger that's the length you want. Trim the ends.
Hang your felt egg ornaments up to start filling the air with the Spring season!

Even making one egg is enjoyable, but more is even better. You can make so many with just a few pieces of felt. In fact, once you decide on the main egg colours, it's actually helpful to simply cut out a bunch of flower pieces. That way you can try out lots of combinations.

Happy stitching!
With many thanks to Mollie Johanson for this fabulous project.